SiteMap is one of the most important aspects in search engine indexing. It helps google bot to search your link and crowl blog, that how they crawl and index it. Now you must thinking what exactly sitemap is?
Sitemap is just an XML page which contains link of each post, page, images and many more means it give a blueprint of your website to search engines like Google and Bing.
It is not created for people but mainly for search engine.
It tells a search engine what all page content and how frequently you update so your blog get indexing easily. It allows search engine to the better crawl blog page.
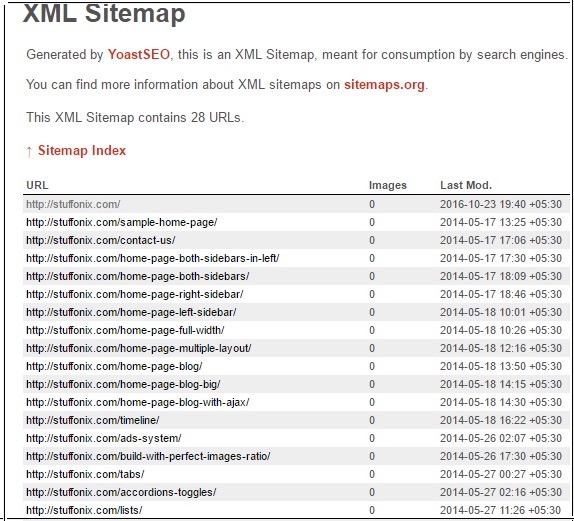
XML file mainly contains 3 things:
- URL
- Last modification timestamp
- Number of Images contain in URL post
See here one sample XML file which contains a list of categories and pages.

Now let’s see how we can create a sitemap?
There are many ways of creating XML sitemap and many plugins also available that help us in creating sitemap but here we are using Yoast SEO plugin to create Sitemap.
Now the question comes to mind, why Yoast only?
Certainly, we can also use other plugins or tools but this plugin helps us in other On page SEO task and we should use a minimum plugin to get work done and load the website fast so if this plugin also helps us in has built in sitemap functionality then we should use this.

Even If you are not interested in using Yoast SEO then you can use Google XML Sitemaps Plugin to create sitemaps for your blog.
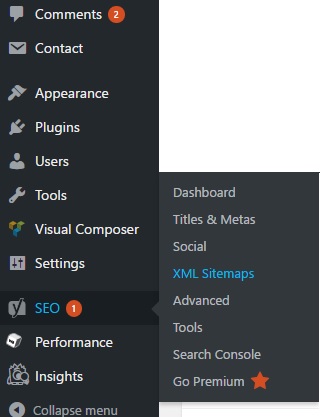
So If you don’t have a plugin then you can download Yoast SEO plugin and then install a plugin. If you are not sure how to install the plugin then you can read How to install wordpress plugin. Once you install the plugin then you can see the SEO option in the left menu bar. so go to SEO » XML Sitemaps.

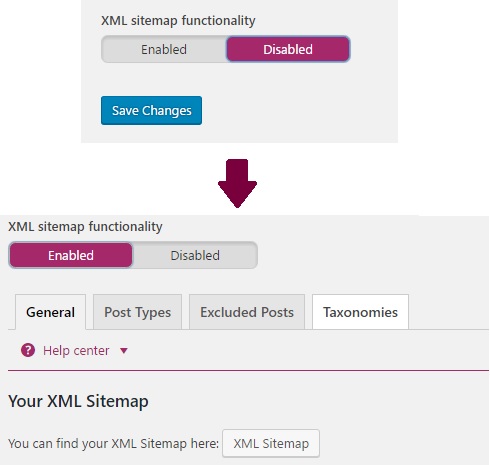
Now enable the XML sitemap so you will find all options to configure the sitemap. You can make changes by just going through options or else keep them the same and click on the save changes button.

Now your sitemap is generated and easily accessible by just click on XML Sitemap button as you can see in above image. It will redirect you to other page with XML sitemap data.
Feature of Yoast XML sitemap
- Customize sitemap by selecting parameters like post, page, image, and many other.
- set maximum entry for each sitemap
- exclude particular post by providing Post ID
So one you create site map then next go ahead and submit it to search engines like google and Bing. How you can submit sitemap with both search engine then read below post.
Do let me know if you find any issue in creating XML sitemap. Hope you like this post and create a sitemap for your blog.
Thanks you for reading!


