Table of Contents
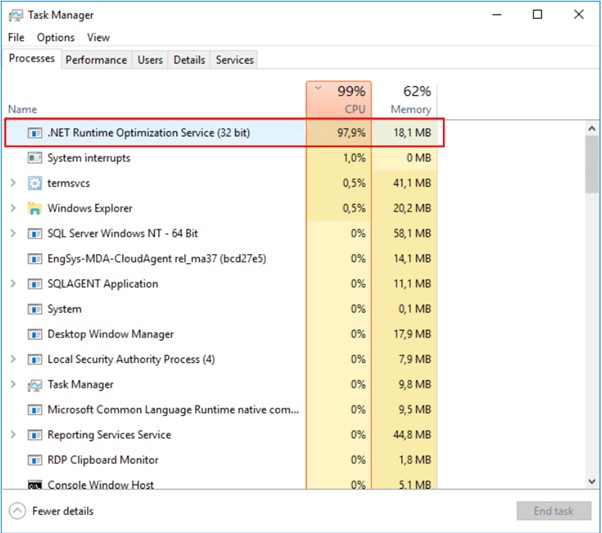
NET Runtime Optimization service, also known as Mscorsvw.exe, is a component of Windows machines that is used to optimize your system to launch apps and programs faster. If you didn’t open task manager, you might not have noticed the .NET Runtime Optimization Service.
Normal usage of the .NET Runtime Optimization Service does not result in high CPU usage. However, if the optimization process takes too long, it may result in high CPU usage. After a Windows update to the latest version, a high CPU usage issue caused by the .NET Runtime optimization service may occur.
What Causes .NET Runtime Optimization Service to have High CPU Usage:
The .NET Runtime optimization service was designed to recompile the .NET framework libraries over a period of 5-10-minutes and is only supposed to run when the system is idle. But many users reported that this is not the case and here are some reasons as to why it happens:
- The service has become corrupted, either because of malware or has been damaged in some other way.
- The optimization service is running very slow, causing it to hit well beyond those 5-10-minutes of its operation time.
- The optimization service shown in the task manager may be the malware running under the disguise of this service.
In this article, we have covered some reliable methods that have proven to be effective solutions and helped a lot of users who reported the .NET Runtime Optimization Service high CPU usage issue.
So if you also come across the same issue, why not have a try?
SOLUTION 1. SCAN YOUR SYSTEM FOR MALWARE.
As we have mentioned before, malware infection is one of the reasons behind the .NET Runtime Optimization Service’s high CPU usage. And to encounter this issue, you have to run anti-malware software such as Malwarebytes and Avast for a full scan. Both Antivirus software can be easily downloaded from its official website.
Once the scanning process is finished, you can check in the Task Manager that the .NET Runtime Optimization Service high CPU usage issue is solved.
SOLUTION 2. SPEED UP THE .NET RUNTIME OPTIMIZATION SERVICE.
Users may experience .NET Runtime Optimization Service high CPU usage if the service runs slowly, as we all know. And for the same, we have the following solution. Just run the below commands and you will be able to speed up your process.
Step 1. In Windows 10 Cortana search box, Input cmd. Then right-click the best match Command Prompt to run it as administrator.
Step 2. Make sure that the operating system is installed on the C drive.
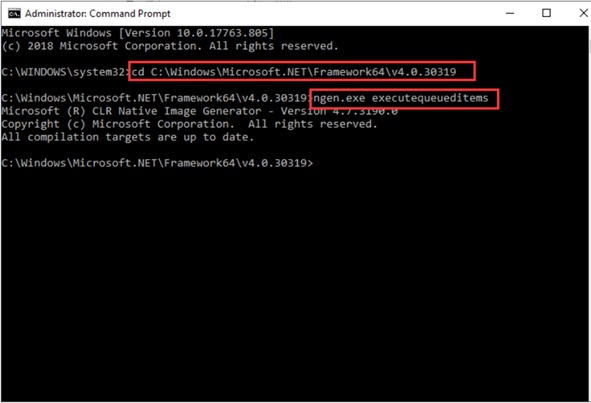
Stem 3. Type the following commands and press the Enter key.
For 32-bit operating system: cd
C:\Windows\Microsoft.NET\Framework\v4.0.30319
For 64-bit operating system: cd
C:\Windows\Microsoft.NET\Framework64\v4.0.30319
Step 4. After typing the following command, press the Enter key.
ngen.exe executequeueditems
Step 5. Check if the CPU usage has gone back to normal from the Task Manager.
When you run these commands, it instructs the .NET Runtime Optimization Service to complete tasks faster by using all the available cores of the CPU, which fixes the issue of high CPU.
SOLUTION 3. RUNNING THE OFFICIAL SCRIPT MADE BY MICROSOFT.
If you are using an older version of Windows, you can run the official Script made by Microsoft to speed up your system.
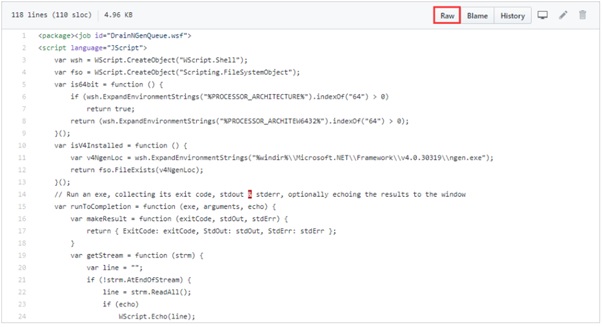
Step 1. Click here to visit the GitHub page of the official script.
Step 2. As shown below, Right-click on the Raw button and select the Save link.
Step 3. The file type should be a Windows Script file, so make sure that it is selected as a Windows Script file and save the file on your hard drive.
Step 4. Now execute the file to run the script.
Step 5. If you need to choose a program to run it with, you can select Windows Script Host.
By running the Official Script made by Microsoft, the .NET Runtime Optimization service can finish its tasks faster and the .NET Runtime Optimization Service issue should be fixed.
SOLUTION 4. RESTART THE SERVICE.
By restarting the service, it completes the process more quickly and it can fix the issue of .NET Runtime Optimization CPU usage.
Follow the below steps to restart the service:
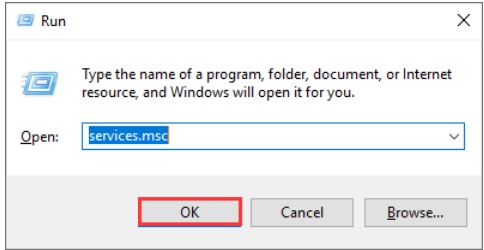
Step 1. Right-click the Windows Start menu and select Run to open the Run box.
You can also bring up the Run dialog box by pressing the Windows logo key + R key on the keyboard.
Step 2. Copy and paste services.msc into the Run box and then press the Enter key.
Step 3. From the seen interface, scroll down to find NVIDIA Telemetry Container and then Right-click on it to choose Restart from the menu.
Step 4. Right-click on NVIDIA Telemetry Container and select Properties from the right-click menu options.
Step 5. In the Properties window, set NVIDIA Telemetry Container Start-up Type as Automatic.
Step 6. Finally, click Apply, and then on the pop-up window, select the OK option to save the changes.
Now, you can check in the Task manager that high CPU usage of the. NET Runtime Optimization Service goes back to normal.
Hope this post will help you to fix the issue of the .NET Runtime Optimization Service’s high CPU usage.
If you have any questions or comments about the above article, please leave them in the comment section below. We will be happy to help you.


